Showing posts with label Tutorial. Show all posts

Monday, February 03, 2014

SAB Free products - Good As Gold Kit

There is a fun card kit available as one of the free SAB items this year.  It is called Good As Gold.  Although I am actually not much of a "gold girl" (silver is my favourite metallic colour), it is a really fabulous kit!

This pictures shows the contents of the kit.


You can click here to view a sweet "Treat Box" that Dawn Olchefske designed using the kit.  The card box tutorial starts at about 2:27 into the video.  


Here are some pictures of cards and other projects made using the kit.

These are cards made using the kit, by Ilina Crouse.  

These are cards made using the kit, by LeeAnn Greff.

These projects were made by Diane Barnes.
  You can click here to go to her website and see how she "altered" the card to make a post-it note holder.   
This card, made by Amanda Burditt, shows how you can cut the card bases apart to make other projects.
You will be able to STRETCH your kit out if you do things like this.

Hope you enjoyed this quick peek at the Good As Gold Card kit!  


Wednesday, January 15, 2014

Wreath Kit

The new Occasions Catalogue has a fabulous new kit - the "Burlap and Blooms Wreath Kit".

Here is a great video, made by Stampin' Up! showing the kit and how you will assemble your wreath.  

What a fun project to add "Spring" to your home!!


Saturday, September 21, 2013

My next purchase!

So, the Envelope Punch Board is the NEW BIG THING that Stampin' Up! has released and it is proving to be a lot of fun.   I had a post about the Envelope Punch Board a while ago so scroll through my posts so you can read more details about it.  Not only is this tool great for making ANY SIZE envelope you need, but you can do other cool things with it!

Check out this video, made by Patty Bennett, showing how to use this tool to make "file folder style" cards.

I love it!  I wish I had been able to do this when I made Brody's Spy Birthday Party invitations in August!  I made file folder cards and had to make a template and trace it onto cardstock and cut it out by hand each time.  This is much faster and cuter!

Here's another video, made by Catherine Pooler!

Here are some cute cards make using the same tool!

This cute card was made by Robin Feicht.  

This was made by Catherine Pooler.  Her tutorial is above .

Amy Storrie made this card.  It's actually a Gift Card holder.  The sides are attached and you pull out the "yippee skipped" insert to find the gift card!

This card was made by Angie Juda.  Quick, easy and fun for Hallowe'en.

I guess you know what I'm getting with MY next order!!!  :)

Have a great weekend,
Andra


Thursday, August 22, 2013

Quatrefancy gift box project

Hi everyone,

Today I am posting a link to a fabulous online tutorial made by Jeanna Bohanon.  It is a card gift box showcasing the Quatrefancy DSP and a sweet stamp set called Label Love.  It's a great project and I know you will love it.  :)

Please click here to check it out!

Enjoy your day,
Andra

Wednesday, March 27, 2013

Designer Type

Hi,

Stampin' Up! released it's first Photopolymer stamp set recently and I just watched this great video of Linda Heller (my RING friend from Convention 2012 - I love her!!!) showing how to use them.  I thought you might like to watch it.

Click here to view Linda's introduction to stamping with Photopolymer stamps.  

If you want to purchase the Designer Type Photopolymer stamp set OR anything else, remember to contact me by Saturday, March 30 by 6:00.

Remember that anyone who places an order of at least $50 by that day will be entered to win a prize package from me worth over $100!!!

Scroll down to my previous blog entry for all those details.

Have a delightful day,
Andra

ps - here are some great card ideas I found online using the Designer Type set!


Saturday, January 19, 2013

Beautiful Butterfly!

There is a stunning new background/large stamp in the Spring Catalogue called "Swallowtail".  It is available in Wood Mount (129213 for $21.95) or Clear Mount (129216 for $16.95).  I have seen some really creative ideas using this stamp.  


Here are a few samples for you to enjoy:


Made by Brandy Cox.  Stamped three times and different layers cut out.  It's hard to see the dimension in this picture.

Made by Mercedes Weber.  

Made by Cheryl Adams.  Embossed with Black Embossing Powder and coloured with markers.    The greeting is from an upcoming FREE Sale-a-Bration set called Vintage Verses.  
Made by Sandi MacIver.
She has a great video to show how she made this card.  Click here to view it.  

Made by my FABULOUS upline, Catherine Sanders.  Embossed, Watercoloured, cut out and mounted on a background that was made with MDS2.  
Made by Kerry Willard Bray.  She used the new Baja Breeze Embossing powder to emboss the entire butterfly on the cardstock.  You can see the outside of the card open here.
This is the card when it is closed.


Hope you like the ideas I've shared with you today.  What is your favourite product from the new Spring Catalogue?   Is there something you'd like me to showcase?  Leave me a comment to let me know!

Enjoy your day!
Andra

Wednesday, January 09, 2013

Border Scoring Plate for the Simply Scored Board

Stampin' Up! made a great little video showcasing how to use this new add-on to the Simply Scored Board.  I know you'll love it!

The Borders Scoring Plate is item #126192 and is $19.95.


Here are some project ideas that use the Borders Scoring Plate:

Made by Barb Mullikin.  The detail is at the bottom of the Whisper White cardstock.

Made by Monika Davis.  The detail is on the So Saffron cardstock.  

Made by Angie Leach.  The detail is on the Crumb Cake cardstock.

This plate looks like a fun addition to the Simply Scored Board!  I guess I'd better get it!  :)

Have a lovely day,
Andra


Wednesday, October 03, 2012

Sweet card tutorial

Hi my stamping friends!

Dawn Olchefske is so talented!  I have followed her blog for years.  She made this super cute card with a great video tutorial that I wanted to show you.  She shows you lots of tips and tricks.


Click here to check it out!

I hope it inspired you to make a card or project today!
Andra

Monday, September 24, 2012

Nugget Jar Tutorial

Wow!  People seem to have tons of time to make awesome little videos showing you how to make projects!  I don't have ANY time to make my own videos, but I'll certainly go looking for great ones and share them with you!

Click here to see how to make these sweet little Perfectly Preserved Nugget Jars!


Have a great day!
Andra

Sunday, September 23, 2012

Ornament tutorial

Hi everyone,

Don't you just love the ornament on the cover of the Holiday Catalogue?  I do!  If you do too, check out this great tutorial (click here) made by Angie Juda, showing you how to make it.


Have fun creating!
Andra

Saturday, September 22, 2012

Great tutorial!

Hi everyone,

Check out this fabulously cute tutorial made by Shannon West (from Stampin' Up!) so you can learn how to make this card that is showcased in the catalogue:

Love it!!  So cute!  

Christmas is coming so I'd better start working on Christmas card classes.  I'll get back to you with dates as soon as I can!

Have a lovely day,
Andra


Friday, September 21, 2012

Sweet little project!

Hi stamping friends,

I have been having so much fun planning and having stamp camps that I have been neglecting my blog!  Sorry about that!

I plan to have the most recent stamp camp projects photographed and posted on my A+ Projects site by the end of next week.

I am already working on the next few classes' projects so I'll post here and email you soon with dates!

For now, check out this awesome idea from Heather Summers.  I LOVE that she posted dimensions on her blog (click here) so you can turn any card idea into a sweet little box!  Perfect for a little gift for someone!  :)


Well, I've got to go heat up the cheese dip for tonight's class!  

Have a delightful weekend,
Andra

Saturday, September 15, 2012

Rosettes are all the Rage!

Hi,

I love this beautiful large Rosette project!


It is so big and beautiful!


Have a great day!
Andra

ps - Order deadline: tonight at 6:00 pm (Saturday, September 15)


Friday, September 14, 2012

Another lovely project

Hi,

I don't make "shabby chic" style things very often, but when I do, I'm often inspired by the work of Kimberly Van Diepen.  

Here is a lovely piece of work she made last week that I just can't wait to try!  


Have a perfect day,
Andra

ps - Next order going in on Saturday.  Contact me by 6:00 pm.  Remember that you get a free spool of the Stitched Satin Ribbon with every $50 you order.


Thursday, September 13, 2012

Pretty Project

Hi,

I have decided to show you some really lovely projects over the next few days so that if you're in the mood to create something really unique, you'll have some fabulous ideas!


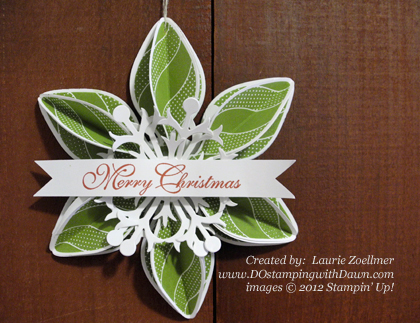
This lovely decoration uses the Ornament Keepsakes bundle stamp set and framelits, along with the Snow Flurry BIGZ die and the Greetings of the Season stamp set.

Click HERE to check out the online tutorial that Dawn Olchefske posted on her blog.  

Remember to contact me by 6:00 pm on Saturday, September 15 if you want to place an order.  For every $50 you spend, you get a free spool of the Stitched Satin ribbon!

Have fun creating!
Andra

Friday, August 31, 2012

Ribbon technique

At convention, we had a great session showing ways to use ribbon on projects.  Of course, there are the traditional ways to use ribbon that we all know, but we were also shown a technique where you punch out a shape and use ribbon behind the punch to "colour" and add texture to the shape.

That description doesn't really make sense, but here's a card (not one of the examples we were shown at that session) that will show you what I mean.  

If you take a close look at this card, you can see that they used Old Olive polka dot ribbon "behind" the tree shape, Red and White stitched grosgrain behind the candy cane and Early Espresso ribbon for the Gingerbread Cookie shape.


It's a cute and simple technique and a GREAT way to use up ribbon scraps!  

So, based on this card, this is how you would make it:
1.  You punch (or die cut in this case) your shapes on the front panel (crumb cake cardstock)
2.  Then set the cardstock down on your base (white cardstock) and use a pencil to trace the shapes onto the base piece.  
3.  After that, adhere strips of ribbon on the white card base so that the entire "pencilled" shape is covered.  
4.  Use dimensionals to adhere the Crumb Cake over your base!

So fun!  You should try this technique, and if you do, send me a picture of your project!  

Enjoy your day,
Andra

Thursday, August 02, 2012

New Firm Foam Ink Pads

Yes, I admit it, at first I was skeptical of the new ink pads.  However, I have used them many times now and I LOVE them AND I just replaced my entire Brights Collection ink pads to the new Foam pads!!  Yep, I am sold on them.

They require just a light tap, tap, tap or "sweet kisses" as a fellow Demonstrator said to me, to completely cover your stamp image.  (I just watched a YouTube video about the new ink pads and the Demonstrator said "treat it like Prom Night - be polite."  HA!)  It's remarkable how perfectly your image will be covered!

Note: the ink formulas have not changed EXCEPT FOR 5 COLOURS (see below) so apart from those 5 colours, you can use your existing ink refills in the new pads.  That's something I was very happy about!

Click here to view a short video made by Shannon West (LOVE HER!) from Stampin' Up!, demonstrating the new ink pads.  


I have taken the following information from the Stampin' Up! Demonstrator website so it has lots of great information for you.  Please feel free to contact me if you have any questions or want to order one or more of these amazing new ink pads!  

I can't wait for my next class so you can try them for yourself!


FIRM FOAM STAMPIN' PADS

With the introduction of the 2012-2013 annual catalogue, we have made a very big change to our Stampin’ Pads.
Introducing firm foam pads! They change your stamping experience for the better.
We know you’re going to love these new Stampin’ Pads--just look at all the exciting benefits listed below:
  • Provide better ink coverage for your stamps!
  • Light-tap stamping produces flawless images!  
In addition, our new Stampin’ Pads
  • Create wonderfully solid images. The Firm Foam releases more ink onto your rubber stamp than the felt pads. When using the Firm Foam pad, your stamp will get an even, solid covering of ink that you may not have been able to achieve with the felt pads. Please note: if you are using the ink pad frequently you may need to re-ink your Firm Foam pad more often. We recommend that you purchase a refill at the time of your ink pad purchase.
  • Have a crisply printed, glossy label on the top of the pad that is easier to read and that will not fade or chip off!
  • Come with colour name labels in all four languages (English, Spanish, French, and German)—just choose your language, peel it off the back, and add it to the side of the pad for easy identification!
  • Use the same patented flip-top case design that stores the inking surface upside down, so the pad surface stays moist!
  • Are available in all colours, including our exclusive In Colors!
Let your customers know about these exciting changes to our Stampin’ Pads. Be sure to have at least one on hand so your customers can see and experience for themselves the improved quality of our Stampin’ Up! Stampin’ Pads.
Please note: Five ink colours have undergone formula changes to improve functionality and colour stability with the new firm foam pads. These colours are
  • Basic Black
  • Basic Gray
  • Marina Mist
  • Perfect Plum
  • Tempting Turquoise
All five colours of the reformulated inks have been fully tested and approved. While using the new ink formula in the old Stampin’ Pads is fine, we do not recommend using the old ink formula in these five colours in the new firm foam pads. Any refills purchased after April 30, 2012, will contain the new formulated ink.
We do not recommend using the Basic Black Classic Stampin' Pad on Whisper White or Very Vanilla Card Stock. Instead, we recommend you use the StazOn Ink Pad.


NEW FIRM FOAM PADS FAQS

Updated July 5, 2012
New Firm Foam Pads FAQs
Q: Why did we switch from felt pads to firm foam pads?
A: We have worked very hard to improve the functionality of our Classic Stampin’ Pads. The firm foam allows for better ink coverage; plus it stays juicer and lasts longer.
Q: Do old Classic Stampin’ Ink Refills work with the new firm foam pads?
A: Yes, with the exception of Basic Black, Basic Gray, Marina Mist, Perfect Plum, and Tempting Turquoise, which have been reformulated to work with the new foam pad material. We do not recommend using old ink refills in these colours with the new firm foam pads.
Q: Before I use my firm foam pad, do I need to tap it and massage the ink around?
A:  No. The firm foam pads are ready for use immediately. The best stamping technique with the firm foam pad is light tapping.
Q: My pad is too wet. What should I do?
A: The closer to the manufacture date, the juicer the pad will be. As the pad ages, this problem will fade. In the meantime, very light tapping will reduce the extra ink on the stamp. You can also use a paper towel to blot the area of the stamp pad that you will be using.
Q: The firm foam on my lighter colour pads looks blotchy. Is this normal?
A: Yes. The blotchiness is caused by the characteristics of the pad material. It does not affect the stamped image.
Q: When I first stamp with certain colours, my images seem a lot darker. Why is this happening?
A: When stamping with your old pads, you had to work hard to get even ink coverage on your stamp. With the new firm foam pad, the stamp gets a lot more ink on it so when you stamp, your image will appear darker.  Once your stamped image dries, the colour will look normal.
Q: When I compare the firm foam pads to my felt pads, some of the colours don’t seem to match. Why is this?
A: The firm foam and felt will not match exactly. Ink reacts differently to different materials. We have quality checked each ink colour to ensure that the stamped ink colour is true.
Q: How long will the pad last before I need to re-ink it?
A: The amount you use it will affect how often you need to re-ink. Please keep in mind that these pads release a lot more ink onto your stamp, resulting in a crisp, solid image. Since the pads release more ink, they will need to be refilled more often.
Q: What is the best way to remove the colour labels from the bottom of the ink pad?
A: Start at the right bottom corner (just above the barcode) and slowly peel the corner up by removing both layers.
Q: Which end of the case do you apply the label to?
A: The label goes on the end where you open the case.
Q: If the ink pad becomes saturated with ink or liquid, will it cause the label to fall off?
A: No, the label should not be affected. However, like most labels, if you pick at it or try and remove it, it may start to peel up.
Q: What are some additional features of the new firm foam pads that I can share with my customers?
A: See additional features below:
  • The firm foam is nice and flat and will not become wavy.
  • The firm foam material does not imprint on the stamp images like the felt pad sometimes did. However, because the firm foam material is a foam base material, the stamp image can momentarily leave an imprint on the pad, which can transfer to a second stamped image. By inking your stamp on different areas of the pad or waiting momentarily for the ink to rise back to the top, you can easily avoid this situation.
  • The firm foam material is soft and has a nice bounce to it. It’s not hard like the felt is.
  • The ink lay-down (how the ink is absorbed into the card stock) is even, not blotchy, and dries quickly. It has an increased opacity and stamps solid images beautifully.
  • Please note: We do not recommend using the Basic Black Classic Stampin' Pad on Whisper White or Very Vanilla Card Stock. Instead, we recommend you use the StazOn Ink Pad.
Q: Will Stampin’ Spots use the new firm foam pad?
A: No. Stampin’ Spots will remain the same.
Q: Can I use the reformulated ink with my Stampin’ Spots?
A: Yes.
Q: Can I use the reformulated ink with my Stampin’ Around Wheels?
A: Yes.
Q: My ink pad needs re-inking during a stamp camp. Why?
A: There are several reasons for this:
  • The ink level in the firm foam pads is less than it was in the felt pads because of the slight difference in material.
  • The firm foam has a variation in thickness and density that requires the manufacturer to adjust the ink level.
  • Heavy stamping techniques will use more ink than light stamping techniques.
  • Larger stamped images will use more ink that smaller stamped images. 
  • Large groups of people using the pad at the same time will result in the ink pads needing to be refilled more often.

Sunday, July 15, 2012

Pinwheels and Panic

Hi,

Well, not too much panic, but I'm trying to pack for Convention and complete projects for my swaps and, and, and... so I'm feeling a bit of panic...

Anyway, pinwheels.  They became very popular last year and are still the rage!  I thought I'd share some sweet projects ideas with you (not made by me...yet!) to inspire your summer card and scrapbook making and even home decor!  If you visit Kimberly Van Diepen's blog, you can see how she made the first wreath.  ADORABLE!!!  When I return from Convention I think I'll make one for myself!

Have fun creating while I pack!!!
Andra

ps - don't forget: if you either place an order online OR contact me with an order of at least $50 by July 23, you'll get an exclusive Convention gift!  See my earlier posts for more information.  I'm looking forward to shopping for you!


Here is the pattern you want to use.  You can use any square size to make them.


Wednesday, July 04, 2012

A lovely project!


Hi,

I was playing on the internet last night, looking at wonderful projects made by very talented Stampin' Up! Demonstrators.  It was great fun and very inspiring.  I kept seeing great things and thinking "I should have a class on that!" and "I can't wait to teach my friends about this!".  and, while I really would like to do it all for you, I really don't have enough time to show you EVERYTHING!

So, here's a link to a blog I found yesterday.  I really liked her video showing how to "stamp" on candles. She used a brand new set called "From My Heart" with a great quote from James Taylor. It's something I definitely want to try, but until I can do a class on it, enjoy this for now:

Click here to learn about how to make some great gifts - including how to "stamp" on candles!  :)

Andra

Saturday, June 30, 2012

There's still time to make a guess!

There's still time to get your guess in for the Blog Candy!  Scroll down to the bottom of yesterday's post and leave your guess!

Sorry for the short amount of time yesterday when you couldn't leave an "anonymous comment".  That had been disabled to avoid spam.  It is now enabled so you can leave a message.  Make sure to put your name under your guess, though!

I saw this cute card online the other day and if you follow this link to Julie Davison's blog, you'll find a tutorial on how to make it!


Enjoy!
Andra