Tuesday, August 07, 2012

Butterflies!

I made some cards this week "just for fun".  I may use them at upcoming classes, but I think I'll show you anyway!

Here's the first one.  It was inspired by a card made by Angie Juda.  Forgive the poor lighting.  I need to work on getting better lighting for my pictures.


Stamp sets: Papillon Potpourri, Petite Pairs
Cardstock: Soft Suede, Very Vanilla, Lucky Limeade
Ink: Marina Mist, Primrose Petals, Lucky Limeade
Accessories: Elegant Butterfly punch, 1 inch circle punch, 1 1/4 scallop circle punch (in the new Mini Catalogue!), Vintage Wallpaper Embossing Folder, Big Shot, sponge, dimensionals.

I'm thinking of having a class showcasing the Papillon Potpourri stamp set and coordinating punch.  Would you be interested in that?  Let me know!

Have a lovely evening,
Andra


Monday, August 06, 2012

August Stampin' Up! Specials and a Contest

Wowza!  There is a lot going on in Stamplandia (made up name) this month!

Here's a run down:

1) SPOOKTACULAR Starter Kit deal!
I wrote about this earlier, but as a quick review:
- the Starter Kit only costs $125 and you get to choose over $150 worth of product for that price!
- there is no shipping cost and only 1 tax on the Starter Kit
- you purchase the kit ONLINE and it's quick and easy.  It ships right to you!
- If you purchase the Starter Kit in August, you will receive a fabulous project kit worth over $75!  (I get one too so that's exciting!)
- you will ALSO get a FREE bundle of special Convention items from ME if you sign up!
- there is NO PENALTY if you get the starter kit and NEVER place another order!
- Contact me for more information and to take advantage of this incredible deal!!!


2) HOLIDAY CATALOGUE!
We can't really call it a "mini" anymore because it's BIG!!!

If you don't have a copy of the Holiday Catalogue, let me know.  I have PILES of them here, just for you!  In the meantime, you can view it online.  Just follow the link to my BUSINESS WEBSITE (top right of menu) and you can check it all out!

There are tons of fabulous new products for you to play with!!!


3) MDS2 is coming...
For those of you who have bought MDS AND those of you who haven't bought it yet, Stampin' Up! is preparing to release MDS2!  There are an incredible amount of improvements and additions to this program.  It looks amazing and so simple to use!

If you already have MDS, you can purchase the upgrade when it is available.  If you purchase MDS now, you will get the upgrade to MDS2 for FREE.

If you haven't bought it yet, you can try a 1 month FREE TRIAL of MDS and this is the perfect month to do it because...read below!!!

CLICK HERE TO VIEW A FUN VIDEO MADE BY STAMPIN' UP! SHOWING WHAT YOU CAN DO WITH MDS!!!

4) BIG MDS DISCOUNTS!!!
Read below for information from Stampin' Up! on August's Digital Special.  This is the perfect time to download some digital content AND print some photo books or other items!

This is PERFECT timing because of the FREE TRIAL!!!

31% OFF DIGITAL FOR 31 DAYS

Get 31% off 31 digital content options and most of our print products for all 31 days in August!


What's on sale? 
ALL cards, photobooks, individual pages, and tags.That's right: print any photobook, board book, swatchbook, individual pages, greeting card, postcard, trifold card, or tag-all for 31% off.
Some of our best digital content. 30 downloads and 1 content disc. Yup, that equals 31.
Here's the list of content:

ItemDigital ContentRetail Price31% Off Price
127217
Floral District Collection Disc $    29.95 $  20.67
118115
Night and Day Designer Series Paper $      6.95 $    4.80
129929
Candid Frames $      3.75 $    2.59
129921
Check This Out Page Templates $      6.50 $    4.49
129609
Blossom Builders Embellishments $      7.95 $    5.49
128999
It's All Me Kit $    12.50 $    8.63
127441
Whimsical Note Journal Template $      2.50 $    1.73
128342
Pinwheel Daily Calendar Template $    12.50 $    8.63
127599
Party Animal Kit $    12.50 $    8.63
127600
Autumn Traditions Kit $    12.50 $    8.63
127620
Grateful Heart Thanksgiving Ensemble $    18.50 $  12.77
126027
Playful Polka Dots Kit $    12.50 $    8.63
130066
World Traveler Photobook Template $    21.95 $  15.15
131221
Storybook Specialty Designer Series Paper $      6.50 $    4.49
130850
Joyful Times Kit $    12.50 $    8.63
124463
One Great Year Digital Kit $    12.50 $    8.63
127175
Limited Edition Embellishments $      3.75 $    2.59
129607
Walk in the Park II Kit $    12.50 $    8.63
129934
#HASHTHIS Stamp Brush Set $      9.95 $    6.87
129923
Book of Birthdays Swatchbook Template $    15.95 $  11.01
121071
Travel Journal Kit $    13.25 $    9.14
129924
Get it Done Kit $      7.95 $    5.49
129005
Sweetly Nested Framable $      6.50 $    4.49
127758
Delight in the Day Photobook Template $    24.95 $  17.22
130862
Blast Off Ensemble $    24.95 $  17.22
129890
Little Milestone Birthdays Greeting Card $      9.95 $    6.87
128892
Designer Gift Cards $      6.50 $    4.49
127580
And a Happy New Year Photocard Template $      2.50 $    1.73
127435
Thanks Tons Greeting Card Template Set $      3.75 $    2.59
127587
Sending Glad Tidings Designer Tags Kit $      9.95 $    6.87
127762
Gratitude Framable Designer Template $      2.50 $    1.73


I think that's all the news for now.  I will be placing more orders later in August, but if you're planning on ordering from the amazing MDS sale list, you can do so as your OWN order on my business website!  It's quick and easy and the downloads will be available for you immediately!  

Oh, one more thing - I have a contest idea:
I have received a number of private emails about your stamping spaces (in response to my post about my new Stamping Studio).  Send me PICTURES of your stamp spaces and I'll select a random winner to receive a gift package to use in her Stamping Space!  

I will post the pictures of your Stamping Space on my blog too.  It'll be fun!  Send me your pics!  

Have a great night!
Andra


Friday, August 03, 2012

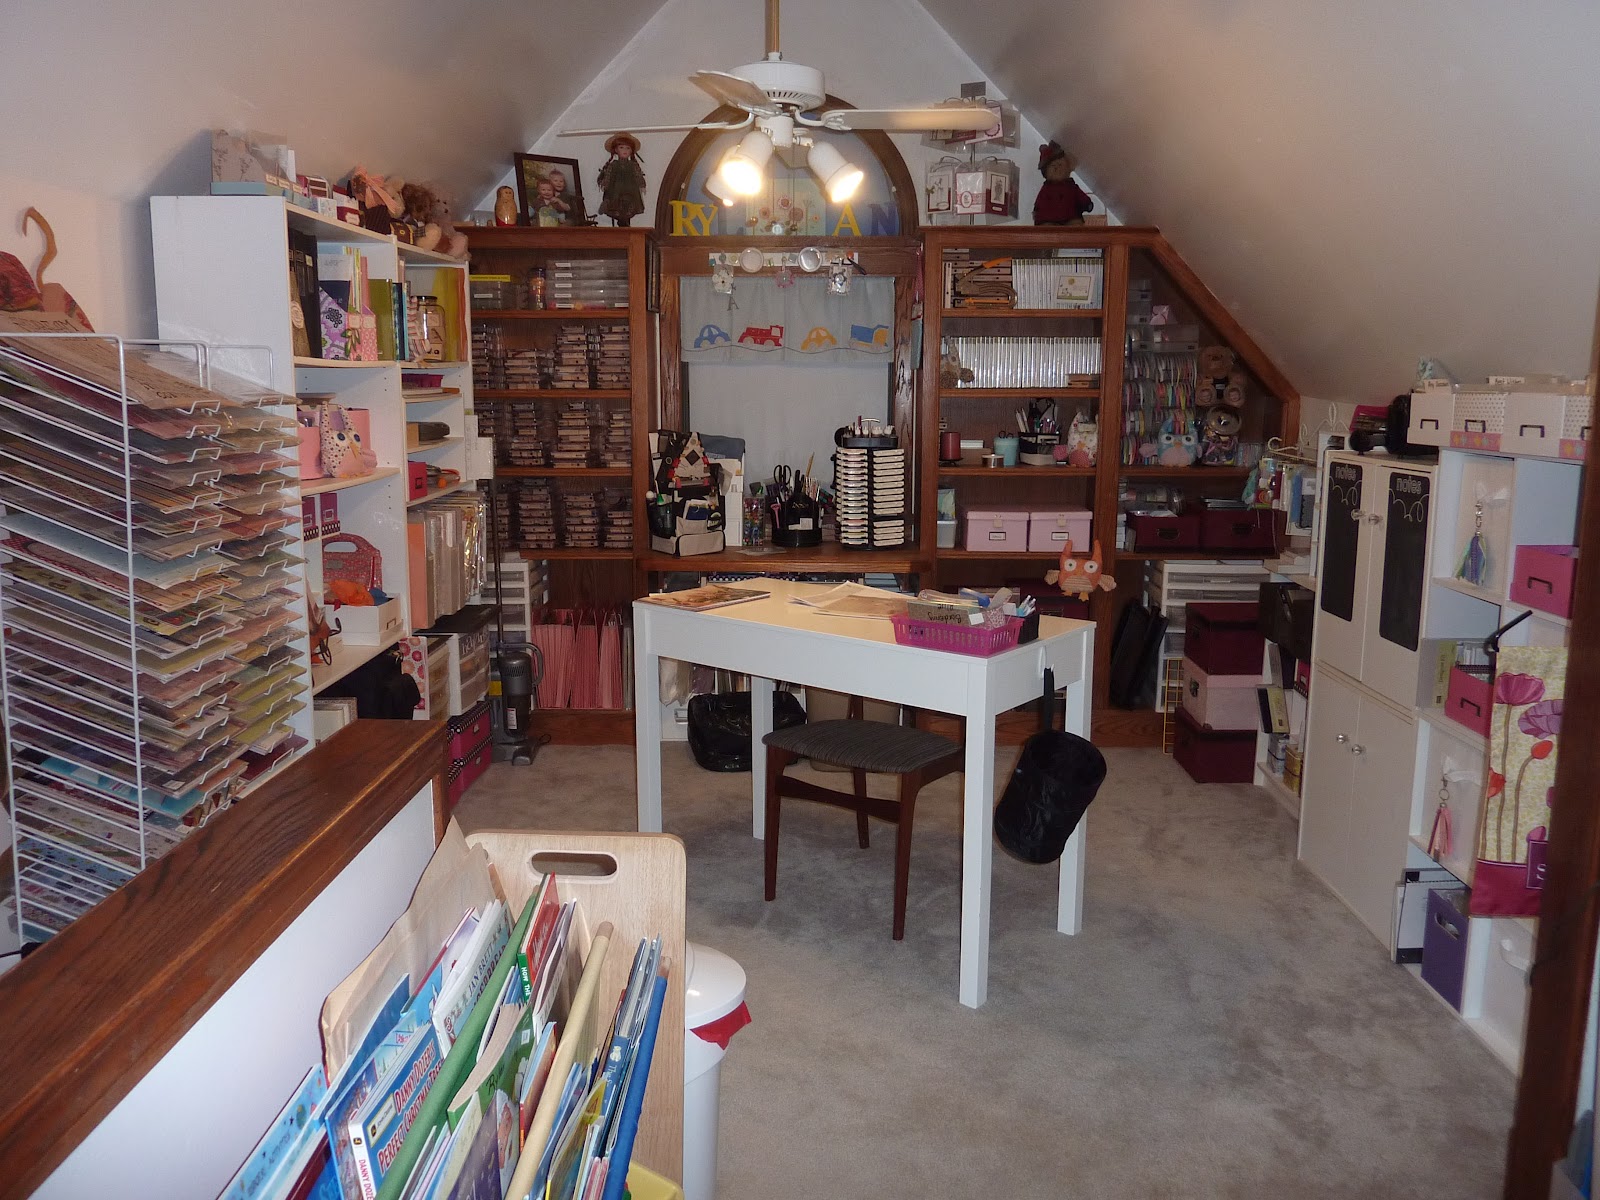
My Stamping Studio

Hi friends,

Over the past few months I have been working to move my Craft Room, (or "Stamping Studio" as I call it) from the spare room in my house up to my 3rd floor (attic) family room space.  I really spread my stuff out when I had the whole spare room, so it has taken quite a while to move everything upstairs and get it organized.

I have been working on it for the past few days and I think it's finally ready to show you!

Here are some pictures of my lovely new space!  I love it more than I thought I would.  Although it is smaller than my whole room was, I am upstairs with my kids and I can be with them.  It's also in plain view which causes me to work harder to keep it tidy.

It is SUPER tidy right now and I'm actually afraid to make anything because it looks so nice!

I'd love to see pictures of YOUR stamping space!  Leave a comment on this post about YOUR craft space.  If you want, you can also send me a photo and I can post them on my blog as a special entry.  Whether your stuff is stored in a bucket in your closet or if you have an entire room (or whole basement!) to yourself, it's all good!  :)

WARNING: lots of pictures and details ahead.  Hope it's not too boring - I was just so excited to show it off since it's clean!!!

This is my stamping space.  On the right you will see the edge of the low wall for the staircase coming up to the 3rd floor.  This is in the back end of the house.  

When looking at my Studio, this is the left side.  More detailed pictures below.
My wonderful 12x12 paper stands.  I bought them when a Scrapbooking Store in town went out of business.  LOVE them.  
The top of the shelf right beside my paper stands.  The binders hold all my Stampin' Success magazines (you get them for free every month when you are a Demonstrator).  The round bins hold things like adhesive, Stamp-a-ma-Jig, Heat Gun, etc.


This is the bottom of the shelf pictured above.  I have tons of things here.  Business supplies, class supplies and other miscellaneous STUFF.  
This is the next shelf.  It is full of old catalogues, my acrylic blocks, my grid paper, card stock scraps, MORE 12x12 paper (my retired packs) and more.  The containers and boxes at the bottom have my sponges, embossing powders, retired punches and more.
 
These are all my wood mount stamps.  LOTS of retired ones I just CAN'T part with!  At the top of this built in shelf are my embellishment containers.  Only TWO of those have current embellishments.  The rest are retired.  (Can you say HOARDER???)  

This shows my back desk area.  I don't use it other than to put my ink pads, markers and tools on.  It's usually messy.  It looks lovely here!  See my little boy curtain?  I think I will use some of Stampin' Up!'s gorgeous fabric and make a new one for myself...someday.

This picture shows the right side of my Studio.  
This is to the Right of my "ink pad" desk.  Clear mount stamp sets on top two shelves.  The pink boxes have my SNAIL adhesive and my envelopes in them.  The burgundy boxes are "seasonal" stamp sets (Christmas, Autumn, Spring) and the dark boxes on the bottom have my Big Shot Dies L and XL dies in them.    
A closer view: top shelf are retired sets.  Second shelf are current.  
This funny shelf was the perfect shape for my ribbon holders (this style of holder retired a few years ago).  I also keep all my fabric here.  
This is the other wall.  I have accessories hanging on the decorative rod.  You can see all my punches and my Big Shot dies underneath them.  The cupboards with doors house all my 8 1/2 x 11 card stock along with other stuff.  My Big Shot lives on top of those shelves.  
Close up shot of embellishments and punches.  I hang items like rhinestones, pearls, linen thread and more.  Easy to find.  

This is the shelf beside my paper cupboards.  The boxes on top are filled with CARDS.  These shelves are filled with kits and envelopes and clear bags and a million other things.  It's really silly how much stuff I have.  :)

This is my desk. Tidy and artfully arranged.  :)  I found this table/desk at Home Outfitters for $15.  The top has some scratches, but I don't care!  I love the drawer.  I keep my tools and paper piercer, etc in there.
This is just the view of one wall from behind my desk (standing in front of the window)  
And this is the other wall from behind my desk.  
This is the view I have of the rest of the 3rd floor from my Stamping Studio.  I love it when the boys are up here with me and we have music playing and we're talking and having fun together.  It's a lovely feeling to work WITH them.  

Oh, this is the cute little kitchenette area just past my Studio area.  I have other stamp stuff here, but the drawers are mostly filled with the boys' craft stuff and games, puzzles, etc.  It's handy to have a kettle and tea up here though.  

Well, I hope that wasn't too boring.  If nothing else, these pictures will be helpful for House Insurance purposes!  :)  

Have a perfect day!  Don't forget to leave a post about YOUR Stamping/Crafting space.  I'd love to see pictures and hear about it!  

Andra

ps - Don't forget: my next order date is August 6.  Contact me by NOON to have your order included!  The new Mini is out so you can get tons of new, awesome stuff!  


Thursday, August 02, 2012

New Firm Foam Ink Pads

Yes, I admit it, at first I was skeptical of the new ink pads.  However, I have used them many times now and I LOVE them AND I just replaced my entire Brights Collection ink pads to the new Foam pads!!  Yep, I am sold on them.

They require just a light tap, tap, tap or "sweet kisses" as a fellow Demonstrator said to me, to completely cover your stamp image.  (I just watched a YouTube video about the new ink pads and the Demonstrator said "treat it like Prom Night - be polite."  HA!)  It's remarkable how perfectly your image will be covered!

Note: the ink formulas have not changed EXCEPT FOR 5 COLOURS (see below) so apart from those 5 colours, you can use your existing ink refills in the new pads.  That's something I was very happy about!

Click here to view a short video made by Shannon West (LOVE HER!) from Stampin' Up!, demonstrating the new ink pads.  


I have taken the following information from the Stampin' Up! Demonstrator website so it has lots of great information for you.  Please feel free to contact me if you have any questions or want to order one or more of these amazing new ink pads!  

I can't wait for my next class so you can try them for yourself!


FIRM FOAM STAMPIN' PADS

With the introduction of the 2012-2013 annual catalogue, we have made a very big change to our Stampin’ Pads.
Introducing firm foam pads! They change your stamping experience for the better.
We know you’re going to love these new Stampin’ Pads--just look at all the exciting benefits listed below:
  • Provide better ink coverage for your stamps!
  • Light-tap stamping produces flawless images!  
In addition, our new Stampin’ Pads
  • Create wonderfully solid images. The Firm Foam releases more ink onto your rubber stamp than the felt pads. When using the Firm Foam pad, your stamp will get an even, solid covering of ink that you may not have been able to achieve with the felt pads. Please note: if you are using the ink pad frequently you may need to re-ink your Firm Foam pad more often. We recommend that you purchase a refill at the time of your ink pad purchase.
  • Have a crisply printed, glossy label on the top of the pad that is easier to read and that will not fade or chip off!
  • Come with colour name labels in all four languages (English, Spanish, French, and German)—just choose your language, peel it off the back, and add it to the side of the pad for easy identification!
  • Use the same patented flip-top case design that stores the inking surface upside down, so the pad surface stays moist!
  • Are available in all colours, including our exclusive In Colors!
Let your customers know about these exciting changes to our Stampin’ Pads. Be sure to have at least one on hand so your customers can see and experience for themselves the improved quality of our Stampin’ Up! Stampin’ Pads.
Please note: Five ink colours have undergone formula changes to improve functionality and colour stability with the new firm foam pads. These colours are
  • Basic Black
  • Basic Gray
  • Marina Mist
  • Perfect Plum
  • Tempting Turquoise
All five colours of the reformulated inks have been fully tested and approved. While using the new ink formula in the old Stampin’ Pads is fine, we do not recommend using the old ink formula in these five colours in the new firm foam pads. Any refills purchased after April 30, 2012, will contain the new formulated ink.
We do not recommend using the Basic Black Classic Stampin' Pad on Whisper White or Very Vanilla Card Stock. Instead, we recommend you use the StazOn Ink Pad.


NEW FIRM FOAM PADS FAQS

Updated July 5, 2012
New Firm Foam Pads FAQs
Q: Why did we switch from felt pads to firm foam pads?
A: We have worked very hard to improve the functionality of our Classic Stampin’ Pads. The firm foam allows for better ink coverage; plus it stays juicer and lasts longer.
Q: Do old Classic Stampin’ Ink Refills work with the new firm foam pads?
A: Yes, with the exception of Basic Black, Basic Gray, Marina Mist, Perfect Plum, and Tempting Turquoise, which have been reformulated to work with the new foam pad material. We do not recommend using old ink refills in these colours with the new firm foam pads.
Q: Before I use my firm foam pad, do I need to tap it and massage the ink around?
A:  No. The firm foam pads are ready for use immediately. The best stamping technique with the firm foam pad is light tapping.
Q: My pad is too wet. What should I do?
A: The closer to the manufacture date, the juicer the pad will be. As the pad ages, this problem will fade. In the meantime, very light tapping will reduce the extra ink on the stamp. You can also use a paper towel to blot the area of the stamp pad that you will be using.
Q: The firm foam on my lighter colour pads looks blotchy. Is this normal?
A: Yes. The blotchiness is caused by the characteristics of the pad material. It does not affect the stamped image.
Q: When I first stamp with certain colours, my images seem a lot darker. Why is this happening?
A: When stamping with your old pads, you had to work hard to get even ink coverage on your stamp. With the new firm foam pad, the stamp gets a lot more ink on it so when you stamp, your image will appear darker.  Once your stamped image dries, the colour will look normal.
Q: When I compare the firm foam pads to my felt pads, some of the colours don’t seem to match. Why is this?
A: The firm foam and felt will not match exactly. Ink reacts differently to different materials. We have quality checked each ink colour to ensure that the stamped ink colour is true.
Q: How long will the pad last before I need to re-ink it?
A: The amount you use it will affect how often you need to re-ink. Please keep in mind that these pads release a lot more ink onto your stamp, resulting in a crisp, solid image. Since the pads release more ink, they will need to be refilled more often.
Q: What is the best way to remove the colour labels from the bottom of the ink pad?
A: Start at the right bottom corner (just above the barcode) and slowly peel the corner up by removing both layers.
Q: Which end of the case do you apply the label to?
A: The label goes on the end where you open the case.
Q: If the ink pad becomes saturated with ink or liquid, will it cause the label to fall off?
A: No, the label should not be affected. However, like most labels, if you pick at it or try and remove it, it may start to peel up.
Q: What are some additional features of the new firm foam pads that I can share with my customers?
A: See additional features below:
  • The firm foam is nice and flat and will not become wavy.
  • The firm foam material does not imprint on the stamp images like the felt pad sometimes did. However, because the firm foam material is a foam base material, the stamp image can momentarily leave an imprint on the pad, which can transfer to a second stamped image. By inking your stamp on different areas of the pad or waiting momentarily for the ink to rise back to the top, you can easily avoid this situation.
  • The firm foam material is soft and has a nice bounce to it. It’s not hard like the felt is.
  • The ink lay-down (how the ink is absorbed into the card stock) is even, not blotchy, and dries quickly. It has an increased opacity and stamps solid images beautifully.
  • Please note: We do not recommend using the Basic Black Classic Stampin' Pad on Whisper White or Very Vanilla Card Stock. Instead, we recommend you use the StazOn Ink Pad.
Q: Will Stampin’ Spots use the new firm foam pad?
A: No. Stampin’ Spots will remain the same.
Q: Can I use the reformulated ink with my Stampin’ Spots?
A: Yes.
Q: Can I use the reformulated ink with my Stampin’ Around Wheels?
A: Yes.
Q: My ink pad needs re-inking during a stamp camp. Why?
A: There are several reasons for this:
  • The ink level in the firm foam pads is less than it was in the felt pads because of the slight difference in material.
  • The firm foam has a variation in thickness and density that requires the manufacturer to adjust the ink level.
  • Heavy stamping techniques will use more ink than light stamping techniques.
  • Larger stamped images will use more ink that smaller stamped images. 
  • Large groups of people using the pad at the same time will result in the ink pads needing to be refilled more often.

Wednesday, August 01, 2012

Daydream Medallions

Hiya,


1) The brand new Holiday Mini Catalogue is in effect!!!  If you don't have a copy, let me know - I have piles of them here just for you!  


I will place my FIRST ORDER in August on Monday, August 6.  Please contact me by noon to have your order included.  This order can include any items in the regular catalogue, the mini catalogue and the clearance rack.  

Email me with your shopping list and I'll do the rest!  


2) The wonderful, exclusive Starter Kit deal begins today!  Anyone who purchases the Starter Kit in August gets a fabulous free kit!  See this blog post for more pictures of the free kit and contact me with any questions you have!  

I'd be thrilled to help you purchase the Starter Kit this month because:
- the next TWO people who sign up will get a fabulous bunch of Convention gifties from ME!!!!
- you get about $155 worth of product in the kit for only $125!  
- there is NO shipping on the kit and only 1 tax!
- there is NO obligation to become an active seller of Stampin' Up! products!  You can purchase the Starter Kit JUST for the great price and free stuff!
- AND in August, you will get this sweet kit (AND I get the kit if someone signs up with me!)  Yay for both of us!  


Now for today's post:
The last set we received as part of our Convention package was "Daydream Medallions". It's a nice set that also corresponds with a new set of dies called the Floral Frames Framelits.

Here are a few projects that were on display at Convention featuring this set:


I have a number of cute ideas using this set that we will play with at a future Stamp Class!  :)  

Enjoy your day,
Andra

ps - Remember, August 6 is my next order date. Contact me by NOON to have your order included!